How It’s Made: A Wolf’s Cry - 2 Animated Page
Oooo… animation! This week we’ll take a look behind the scenes at A Wolf’s Cry, page 2. I’ll show you the storyboards, pencils, and script, and at the end, discuss animating the fireworks. Click the button below to read more…

Script
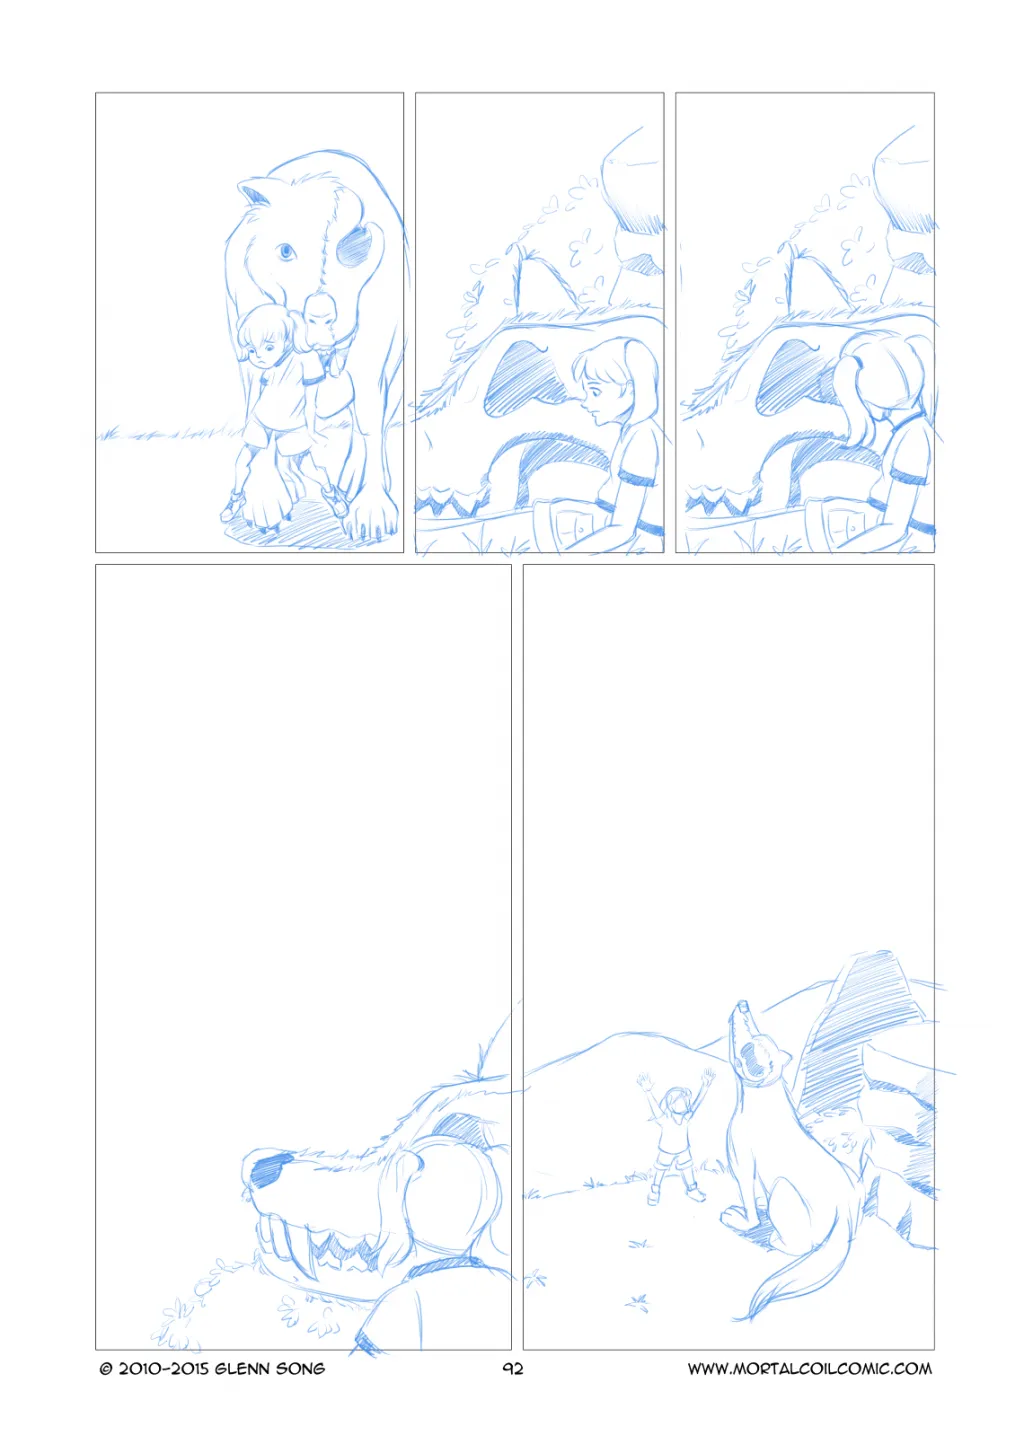
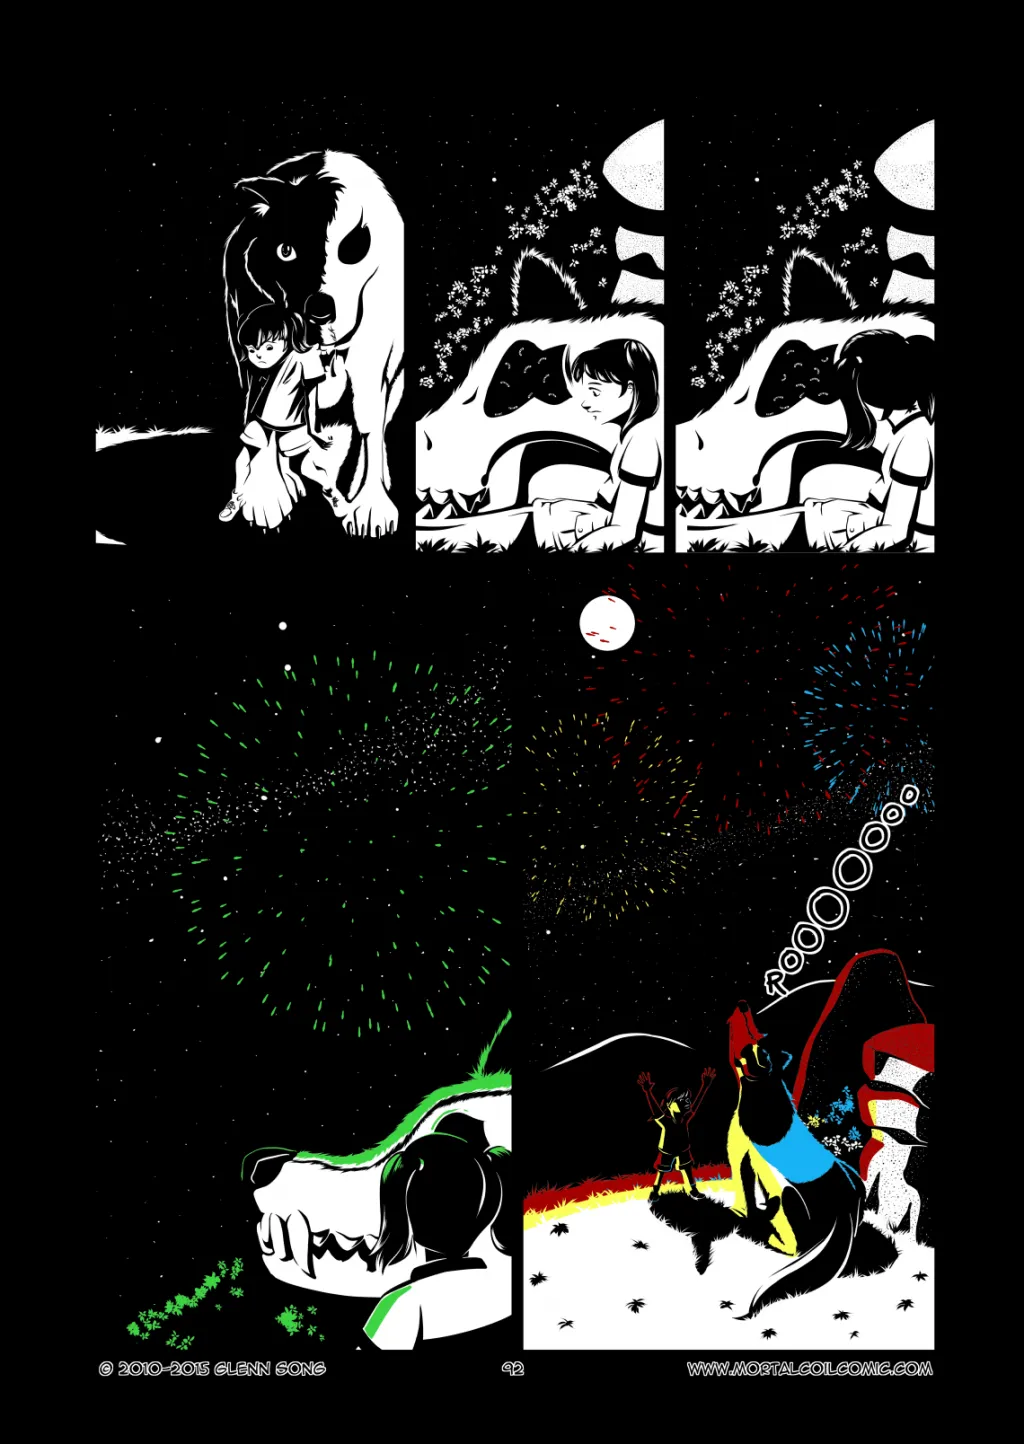
1a. Hana falls on her bottom and ends up sitting up against the wolf as he lays on the ground.
1b. She begins to cry but stays strong.
HANA
You, you won’t eat me.
WOLF
A tiny morsel like you wouldn’t fill the gulf of my stomach.
1c. Hana turns to look at the wolf.
HANA
They say you’re the moon god, is that true? Or are you our kami?
2a. We look up at the moon from the Wolf and Hana’s point of view. The wolf looks as if he longs to return to the moon. There’s a thin sizzle of something in the sky — it’s a firework.
2b. A firework blossoms in the night sky.
3. The wolf howls and Hana tries to calm him down. Hana pets his fur trying to calm him down.
HANA
Don’t be scared! They won’t hurt you! It’s the festival below.
Storyboards
The images for this page are pretty sparse, mainly because the big feature was to add animation to it. It’s a bit gimmicky, but at the same time, I thought it would add to this page. The idea is that the Wolf is tired at this point. He’s done everything he set out to do (i.e. revenge) and he’s lost everything. It’s not his world anymore either, and the page was to illustrate part of that. Hana asks him questions, but he’s interrupted by the sight of a sole firework flying into the sky and bursting. That was the scene I wanted to illustrate, and I felt it would be better with animation than without.

Pencils
Final Art
Animated GIF Process
One thing I’ve been wanting to do is to really embrace the fact that This Mortal Coil is a digital comic. Right now the pages adhere to a B4 manga size page, but thinking about it: why should it?
As an aside, there are some good reasons why it should, and it mainly deals with how the comic reader works at the moment, but I’ll discuss more about that in another post.
The comic being digital means I could make it so that pages were animated or other pages could be interactive. There’s also the work I’ve done for The Shrine which is, again, something we’ll discuss later, but all of that is experimental work that could feed back into the comic itself. This is the first serious foray into doing animation for the comic pages.
Animation Keyframe and Pre-vis 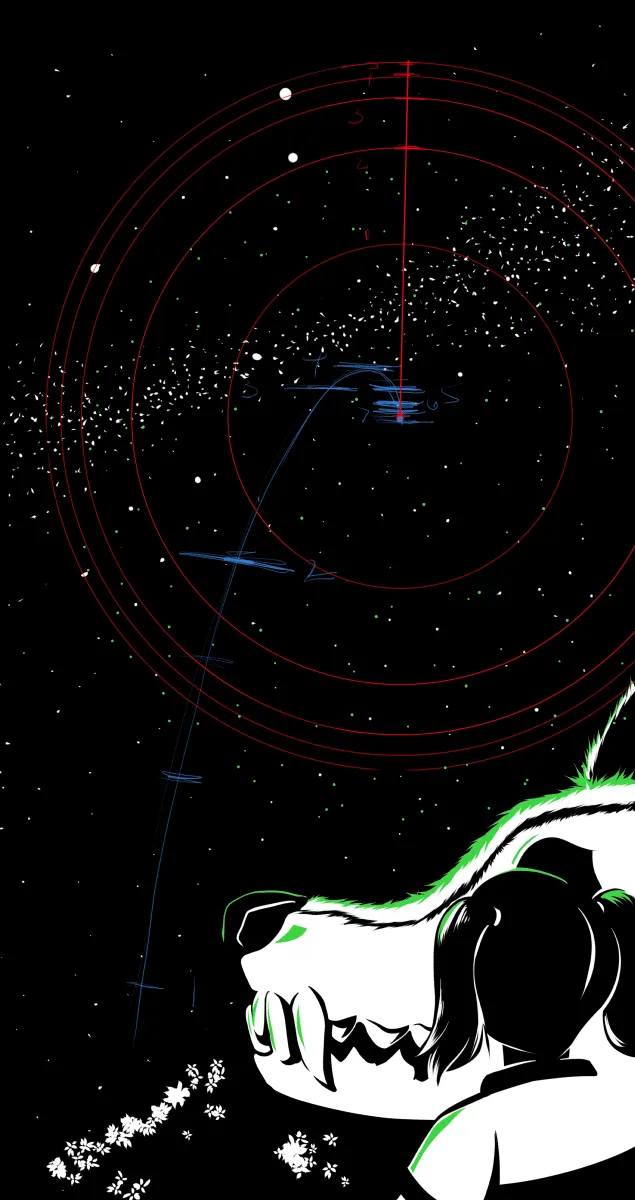
So I started out very simply by isolating one of the frames I wanted to do the animation in. Using Manga Studio I drew the arc of the firework rocket and simply divided the distance it moved forward each frame so that it would appear to shoot up into the sky quickly and then slow down as it arced in the sky and fizzled out (before the big explosion). To draw the rocket motion, on individual frames I drew the rocket at each point in the keyframe diagram. I could have done inbetweens and it might have made it smoother, but I’m up against a few limitations:
- Filesize (more frames, bigger file)
- Time (I still need to speedily finish things to get onto the next page).
The firework bloom was the difficult part. As you can see in the image above I played around with drawing concentric circles in the same vein as the rocket arc. Each time the size of the circle grew bigger but only by half. I did draw a 2D circle exploding out, but I wanted it to be more three-dimensional.
Blender to the Rescue 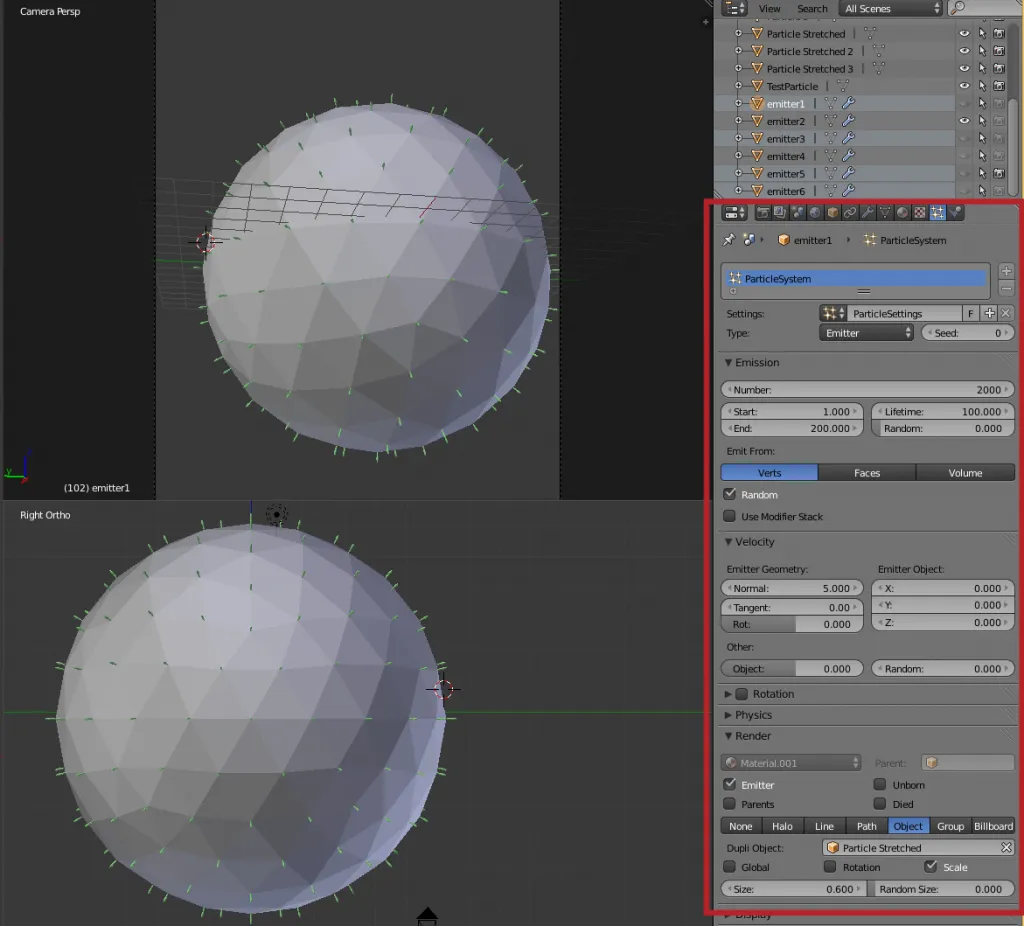
The setup in Blender is actually easy — granted you know how to use Blender, and I’ve had a lot of experience, since I setup scenes in Blender to draw over.
To start, I created an isosphere and I wanted at each vertex to fire off one of the sparks from the firework bloom. Yeah, you could manually put a 3D model at each vertex of that isosphere, but an easier way would be to use a particle system.
This image shows the setting for my blender particle setting: 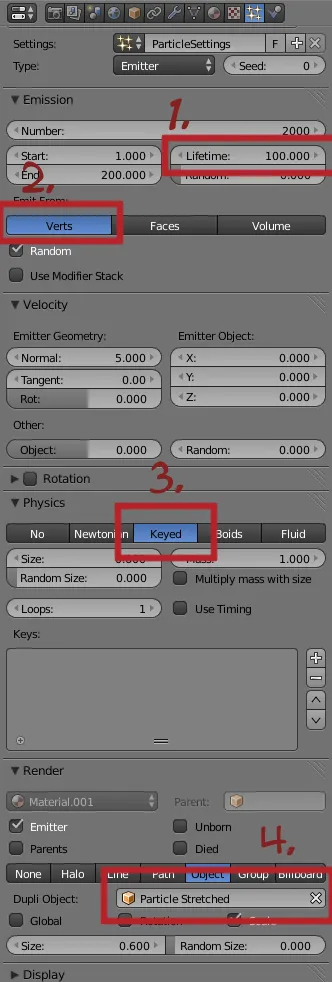
Some key things to note about the particle system attached to the isosphere.
- Lifetime. Make sure the lifetime is set high enough, because what we want to do is to move to a middle frame where the sphere has all of it’s vertices populated with one firework 3D spirte. That means each one needs to live that long for that to happen.
- Select “verts” to make the particle emit from the vertices. At least in my case, this is what I wanted.
- We don’t want physics. I set it to “Keyed” since I intended to use it that way — but we’re not really using the animation timeline for making our keyframes.
- The name of your 3D sprite. This is the 3D mesh I created and put on a separate layer in Blender. This is the thing that shows up at the vertex.
I created these 3D models on another Blender layer to use as my 3D sprites for the particle system: ![]()
They’re basically meshes of a sphere that gets more and more stretched out, and they models are used in reverse. When the bloom begins you see the stretched out ones and over the course of the animation, they shrink until they’re spheres and then grow smaller. Texture-wise, it’s also really simple. They’re just solid colors. I have a palette of colors that I’ve used before in the comic (blue, green, and red) and I decided to just borrow those colors (including an additional yellow one) to render these fireworks different colors.
The 3D sprites are just given a solid color material using the shadeless setting. I don’t use Blender Cycles for this output — just the regular Blender Renderer.
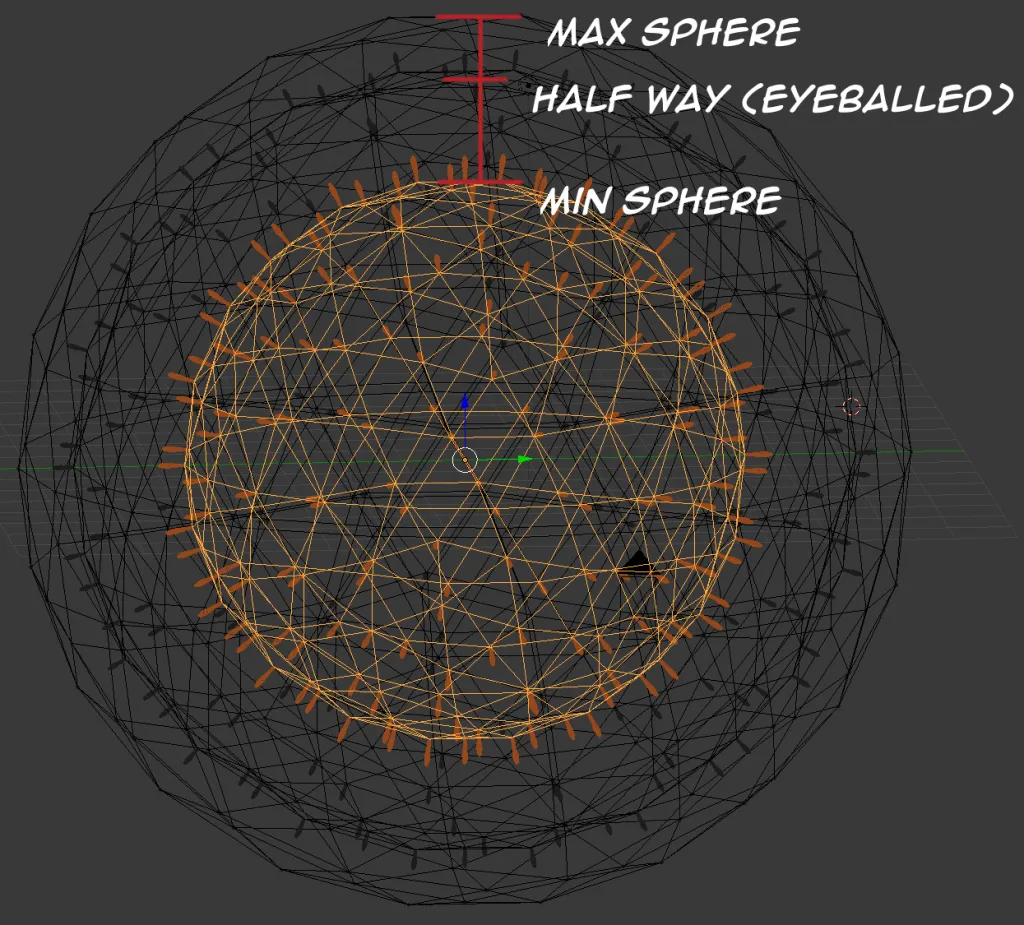
For all of the emitters, if you start the animation in Blender you’ll see that not all of the vertices get a particle, but if you slide it to frame, oh, 100 you’ll see that all of the vertices have one, and that is the basic setup for the particle asset. A sphere with particles arranged like that makes up one frame.
To get the full animation, I just needed to make 6 spheres with emitters using each different 3D sprite. The spheres are arranged in two ways. First, each sphere is bigger than the last one. To determine that I sized the first and last emitter and then using the different in radius between them, I placed the next sphere’s size at the middle between that difference (it’s eyeballed), and then taking that sphere and the outer one, I find the half way point and size the next sphere to sit in there.
I set up the camera and gave it a large image size (1920x1920 pixels). There’s no complex shading going on. The sparks are all shaded the same shadeless material. The particle emitters are given a transparent material so they don’t show up. You do want to render without a background though, and to do that, go into “Scene” tab and uncheck the “sky” checkbox and you should be able to just render the sparks. I turned each spherical emitter on and rendered each frame out. I took that bloom images and composited the image in with the rocket I made in Manga Studio.
For the 4th comic frame’s animation there are 18 frames (including empty frames at the beginning and end). The last frame has 26 frames because it has a few fireworks go off. Once I had the animations arranged I had to do the final filming in Manga Studio. This basically involves turning layers on and off. To do that, I organized each frame by a frame number “f##” so I knew which one to turn on/off for each PNG I was going to save. Yes, this means I have layers that are empty, but they act as place markers for the frames I wanted to include in the animation.
To stitch the images together, I was using a web tool called GIFMaker.me, but a better alternative (and hey, I found a use for it!) is GIMP (or Photoshop if you feel the need to give Adobe 50 dollars every month, which I don’t). GIMP, it turns out, can output animated GIFs. It can also load individual layers into one workspace as layers — super convenient! Once I had that done I cut the raw GIF. It was 4.5 MBs.
GIF Filesize Optimization
That’s not really going to fly. I want the filesizes small. Each page of the comic is optimized as a PNG and clock in around 200-300kb. Still big, but the images are fairly big themselves. If only there were a way to optimize the GIFs…
And that’s where this website: http://ezgif.com/ comes in handy.
They have a “gif optimizer.” I uploaded my raw image there and used the color resolution adjustment. So instead of encoding 255 colors, I just encode 16 or 32 and that drastically reduces the file size — by at least half. I can get away with this since I don’t have many colors. Yes, so 2.6 mbs for the full page as an animated GIF. The individual frames are smaller.
As a note, I upload the comic to Tapastic. If you choose to optimize your GIF with the LZW compression (lossy GIF) you can get further savings, but Tapastic won’t support it. On this website, I was able to use the lossy compression because Wordpress doesn’t seem to care, and it works fine and the page size is just 320kb.
Experimentation
I played around with the looping for the animation. Originally it was a whooping 40 frames. I tried to get frames 4 and 5 to be offset from one another while looping, and while it worked decently, 40 frames was a lot — we’re looking at ~7MBs of image since the comic page is 1140x1608 pixels. Optimize that and it’s still 3-4 MB in size (not using the lossy compression).
Wrapping Up
So that’s the process and the tools I use:
- Manga Studio for keyframes
- Blender for 3D sprites
- GIMP for making the GIF animation
- and EZGif for optimizing the color resolution of the GIF.
All in all, I spent maybe a good 3 evenings on this and that’s probably a good. If an evening is ~5 hours, then maybe 15-20 hours in all to get the effect and learn all of this process. Next time, it should be faster, but it depends on what I am animating. Not every page going forward will be animated, but I will try and do it if it makes sense.
That’s all for this week’s How It’s Made. I hope this inspires you to try some keyframe animation. I’ve always loved animation and to be able to include it in Mortal Coil is fun and cool. :) See you next week!