One and done, son.
Catherine’s already tired of Natsumi, and who could blame her…
Behind the Scenes
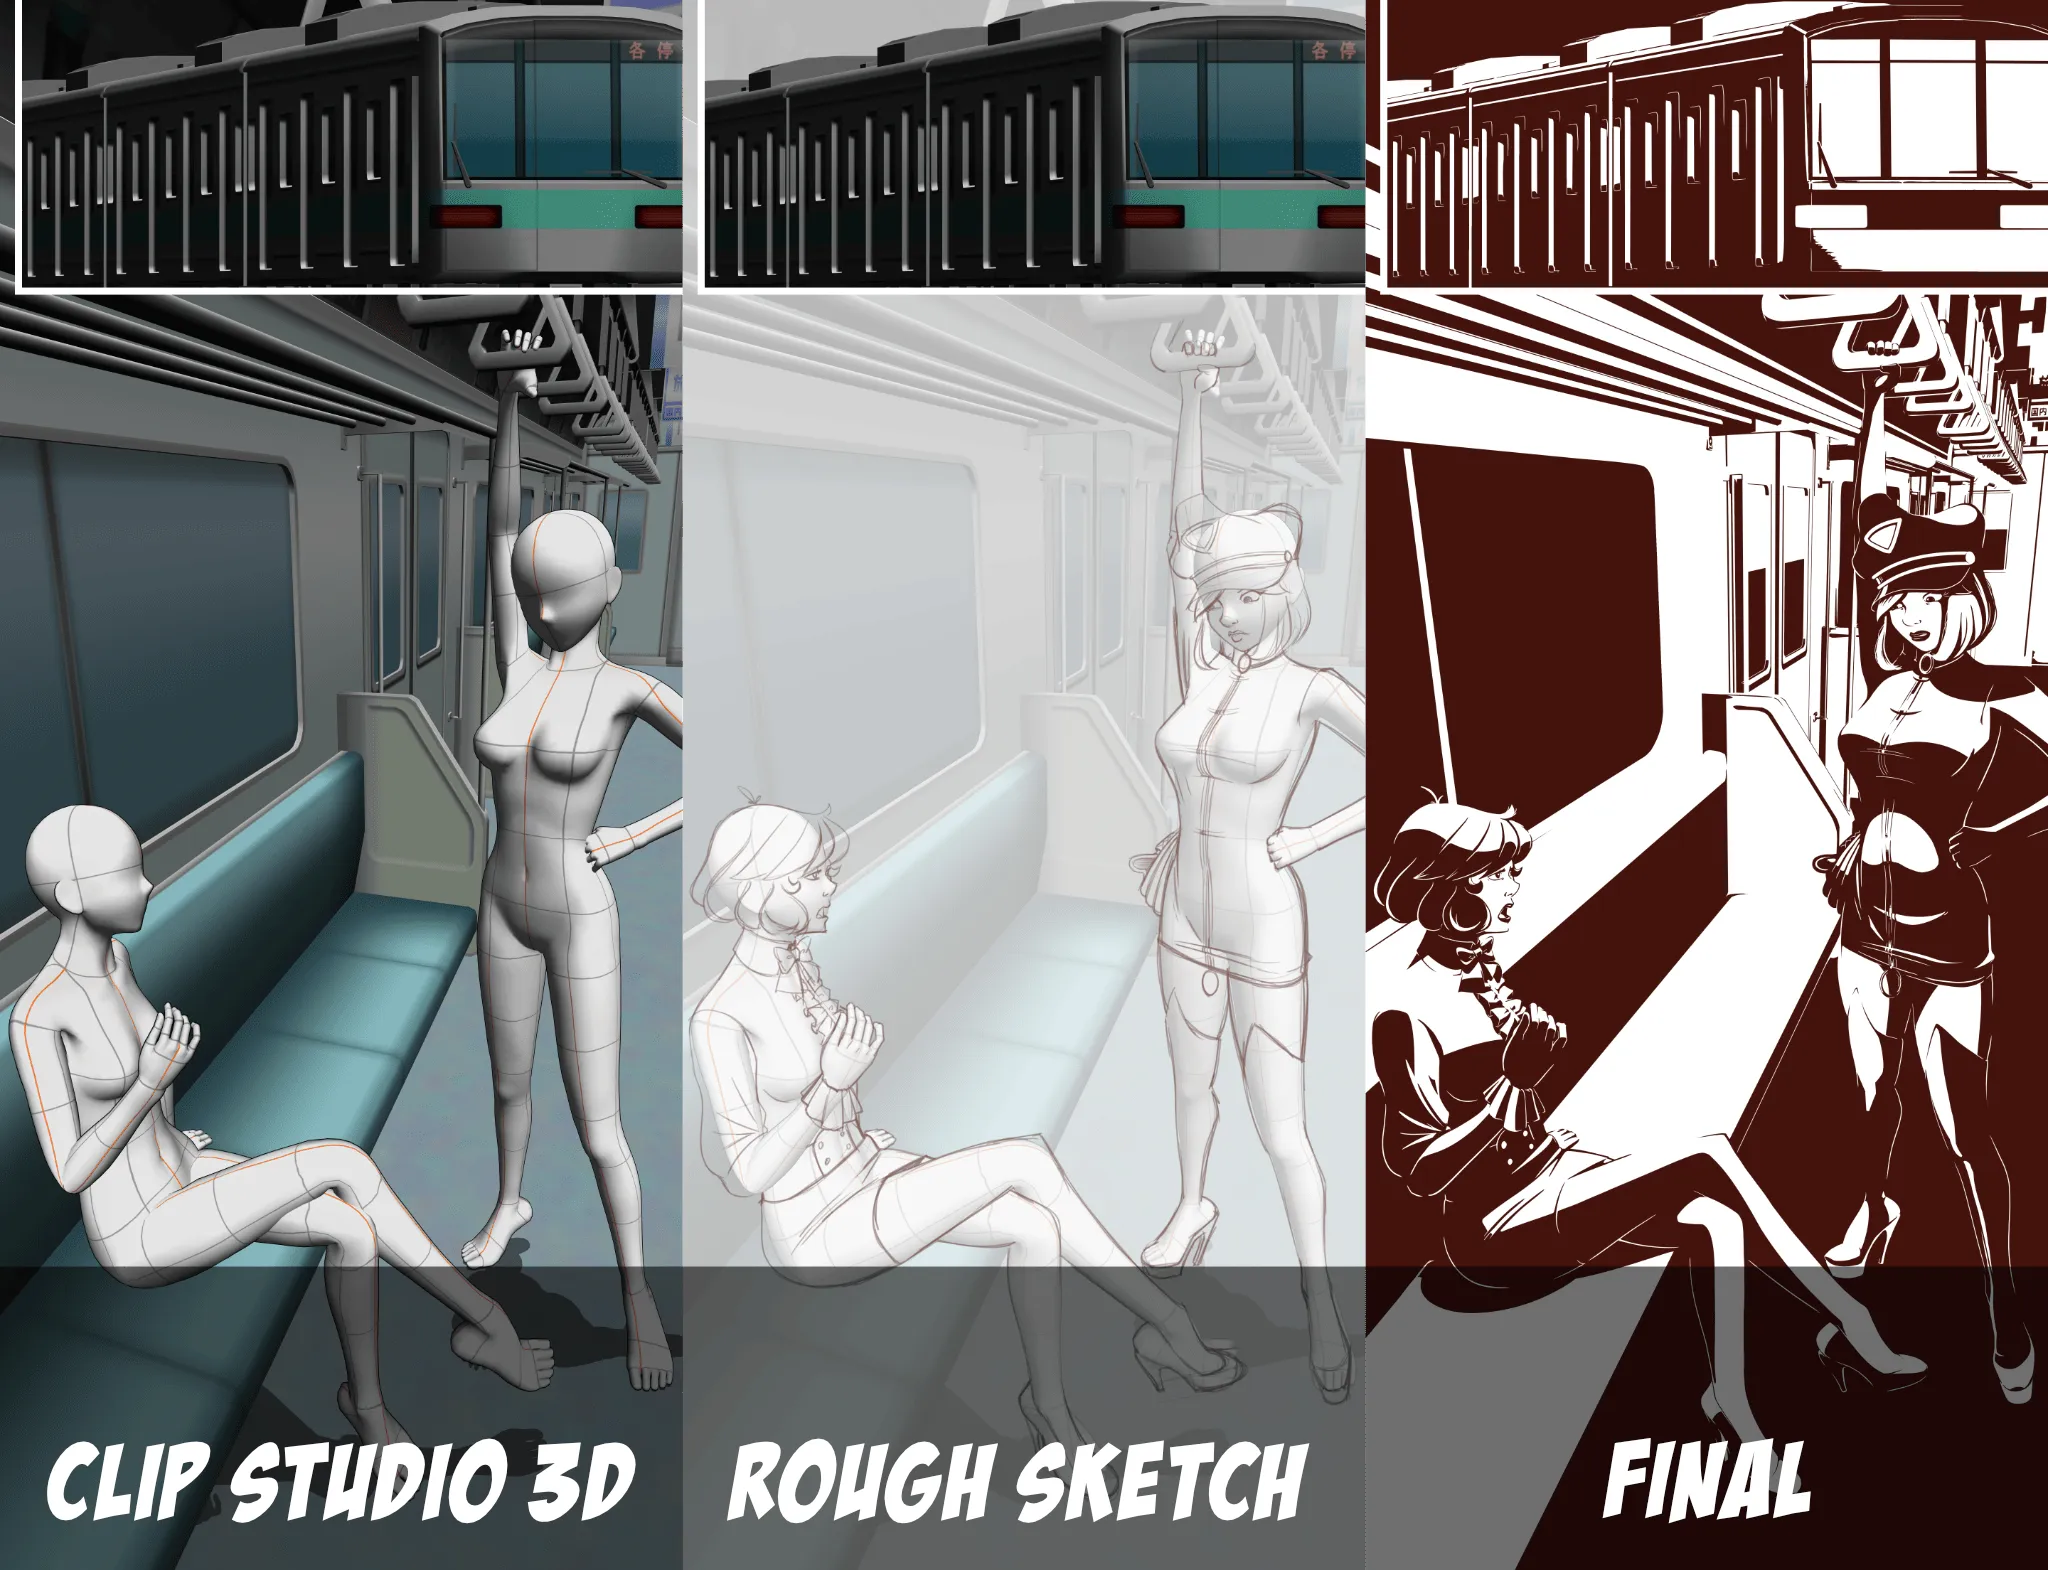
I composed this page using Clip Studio’s 3D features which came in really handy.
My main thing was to get an interior and exterior shot of a Japanese subway car. I would usually go scouring free 3D sites looking for these kind of models, but then I recalled that Clip Studio has a Japanese subway train as an available 3D model. I spent sometime posing the interior into the perspective I wanted. Of course, once I had the short-hand for the interior, I had to place the characters. Yes, I could draw them in by hand. It would take more effort to match the perspective, but Clip Studio can help me here too.
There are 3D human models that you can drop in and pose and for this comic it seemed like a good time to experiment with all of that. Just like the subway car, you can drag-and-drop a 3D character into your canvas. There are some helpful tools such as putting the model on the ground so it matches with the 3D backdrop. From there you can click on the wrists and feet to manipulate them and pose the character using the built in inverse kinematics system — that is, if you move the wrist the arms, shoulders, and body will also move and contort to follow the pose you’re trying to create. It’s super useful. I blocked in the poses I wanted this way and arranged two figures for Natsumi and Catherine.
Clip also comes with stock poses that you can drag-and-drop onto the 3D mannequins if you want something quick as well. This also includes stock poses for hand gestures that you can further drag onto a pose to blend a hand gesture in with a body pose.
Once I blocked in my poses, I fine tuned them using the individual rotation widgets for the X, Y, and Z planes. In the space of 30 minutes I was done with the image composition.
One issue with Clip Studio’s 3D are the controls. They’re clunky. If I were in Blender, I might setup the quad view mode, that is a mode where you can see your 3D composition from the front, left, top, and perspective so you can compose your models easier. I didn’t really look for a quad view feature in Clip Studio, but there wasn’t a button that jumped out at me for such a thing.
You can place/rotate/scale the 3D model if you click on it. You can also manipulate the 3D camera’s placement/rotation/scale separately. But, in order to use these tools, you click on the icon in the tool bar and then hold down and drag on the icon to activate it. Like I said, it’s clunky. I also had to move the camera around a lot to ensure that my poses worked for the characters before settling on my final camera angle.
To change field of view (FOV) of the camera to flatten or distort the perspective of a scene you can roll the mouse wheel up and down.
The comic is two frames and I use Clip’s built in comic framing/paneling tool which creates a separate set of layers for each panel. This is how I’m able to have two different 3D compositions in the same document.
From there, I lowered the opacity on the 3D layer and using another layer on top, I drew the rough 3D sketch. I was going to use the 3D for the subway car interior as-is so my effort was focused on sketching Natsumi and Catherine. Another nice thing about Clip’s 3D posable human models is that you can adjust the body type using a set of 2D sliders. I made Catherine a bit bustier than Natsumi. To further help me, I also put them on tiptoes — I posed their feet as if they were wearing their heels to help me draw those in and give them the right height.
When I sketch using a 3D model, I try not to conform 100% to it. It’s meant to be a guide, a shortcut to foreshortening a form in perspective. From there I take my own liberties to further distort or exaggerate things. One thing I had read somewhere was that you’re not going for being technically right, but visually right, if that makes sense. You want to mostly conform to the perspective of your scene so things appear oriented correctly in space with one another, but from there, I exaggerate features to make it feel right because strictly following the perspective guides may make your figure look oddly distorted. Ultimately, your eye is the final judge of whether you like it or not.
I’d say over all this comic took about 15 hours to do.
The dialogue is all improvised based on how I think they’d talk to one another and what they’re feeling about this new partnership.
Another shortcut I took for rendering in high contrast was to color pick the light color in the 3D composition using the Select Color Gamut feature (it can be found in the Select menu). This captured all of the white parts which I could then subtract from the comic’s base high contrast color. It gave me a foundation to paint the background subway car. A lot of that involved fixing the aliased, pixelated lines. I also make the comics at 4k resolution (3840px width) and reduce it to 2048px. So it’s really silly to do that since I’ll be reducing the image, but still my brain wouldn’t let it go.
That’s all for today’s comic. I hope you’re having a great Saturday and that you’ll have a great weekend. I’ll see you back here next week!