Animating with Manga Studio and GIMP
Published:
Friday, Sep 18, 2015, 10:00 PM UTC
Hey guys, so instead of the typical script, storyboard, and pencils that I’ve shown for previous pages, I’m going to talk about the animation process behind this page of This Mortal Coil. If you are interested in learning how I used Manga Studio 5, GIMP, and a bit of python scripting to generate this artwork, then definitely read on. Warning: it will get technical.
Video version of this blog post
Edit: 3/16/2016
I figure I would add this to the blog post instead of writing a new one as people have searched and found this page in the past.
The explanation for animating below is long and technical.
Here’s a 9:40 video showing the process I went through.
Also, if you’re using Manga Studio 5, this whole thing is actually outdated now, because the updated version of Manga Studio 5.0.6 and Clip Paint Studio has an animation timeline.
This video pretty much functions as a historical record of how I did the animation for “The Miracle” back in August to October of 2015.
If you like the video and would like to see more, please leave a comment below. Otherwise, thanks for watching.
Overview
Some stats: I started working on this page August 28th and finished September 13th. So about 20 days and I would estimate 80-100 hours. So, in other words, very expensive and time intensive.
There’s about 240 frames — 87 frames of animation for the top frame, 63 frames for the second, and 90 for the last. Now, that doesn’t mean I drew every single one of those 240 frames that’s the final artwork. There’s plenty of reuse such as the blinking animation seen throughout the page or in the first frame, the hair swaying back and forth. Here’s just the hairswaying animation.
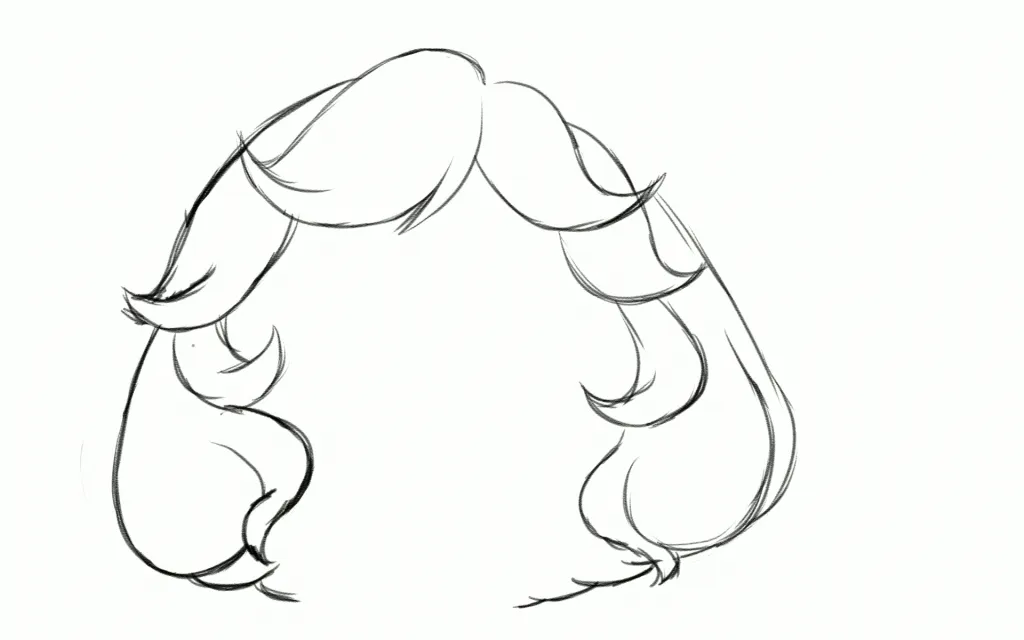
Here’s what the individual frames look like. There’s seven in all and it’s basically just the hair drawn at the max left and right sway along with all the in-between images.

You’re probably wondering: how the heck would you do this in Manga Studio 5? It is by no means simple. If I had an actual digital animation package, I would probably have onion skinning, which allows me to see the frame before and after so I can plan my in-between image easily. Without having a nifty, ready-made feature like that, I’ll have to improvise, and this is how you’d do it:
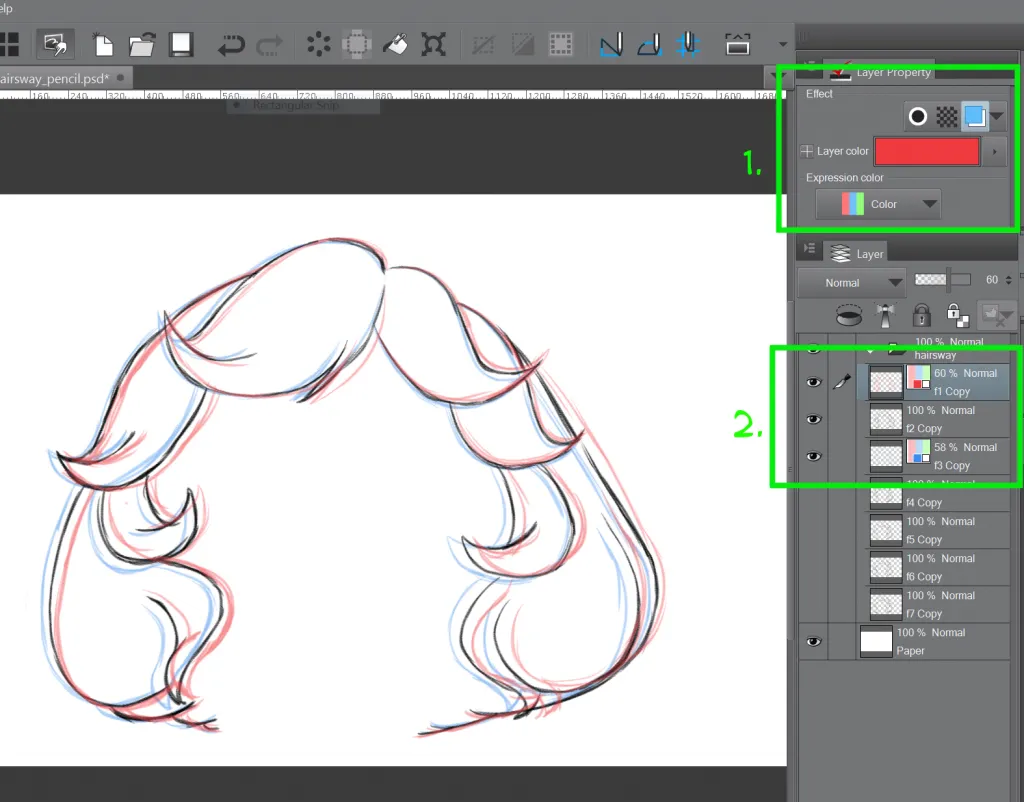
In the image above, in item #2, you can see the layers that I’m working with. You can see layers “f1 Copy” and “f3 Copy” are tinted red and blue and I’ve also changed the opacity. With those layers changed, I can go in with the “f2 Copy” layer and draw a digital frame inbetween. FYI: these layers are copied out of the actual file to isolate them for demo purposes.
Look at item #1 in the image, that’s how you do the tinting. The blue and white button (called Layer Color) controls, well, the layer color. If you drew the layer in black, it’ll tint it non-photo blue by default. It’s an old artist trick. You draw with blue, ink over in black, and then using a copier, copy your work and remove the non-photo blue lines via copier because it can’t see them. In our case, you can change the color to be any tint for the layer, which is what I’ve done here, and it allows me to onion skin the before and after frames. To do the in-between, it’s basically trying to find where the lines and curves go in-between the red and blue lines and draw them. If you wanted to do that traditional page flipping test for your pencils that you see animators do, you can toggle the layer on and off (it kinda works).
Everything is broken down into layers.
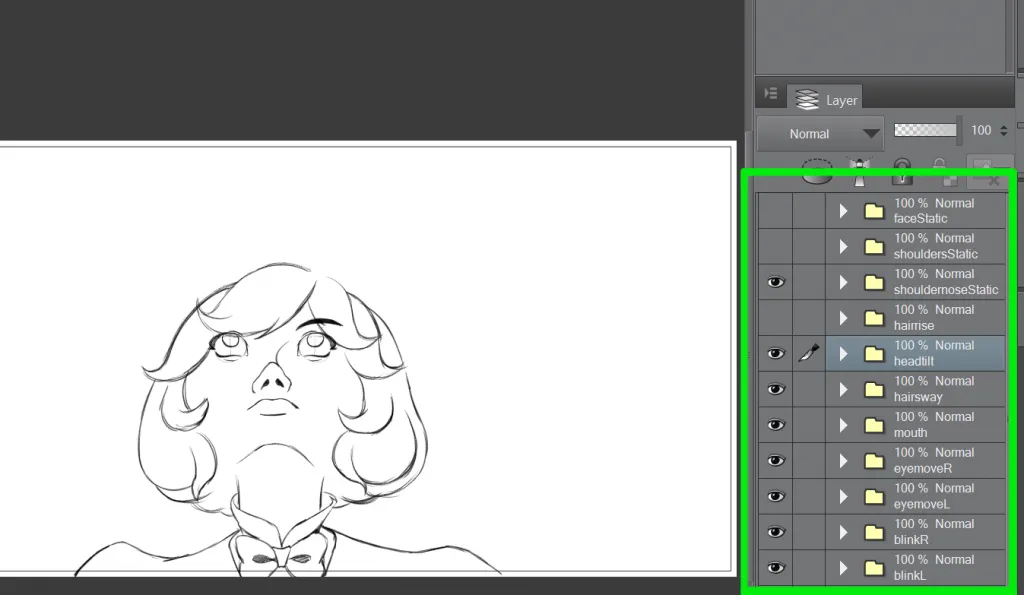
For frame 1, this is Kamiko. There’s a layer group of frames for her hair swaying as seen above. There’s a layer for her static facial expression. there’s a layer for her eye blinking and also for her eye movement. There’s another for her mouth. If you recall, she tilts her head later, so you can bet there’s another layer group for that animation. The only thing that’s really static are her shoulders which have, you guessed it, their own layer.
It’s a lot of layers and layer groups. It’s intimidating, I won’t lie to you on that.
And so the question is: how do you even get a final animation out of that mess of layers?
Animation Filming
So, if we think of this as a digital, yet traditional form of 2D animation, what we’re doing is preparing individual cels — you know, like you would with a peg board. You’d then film them by snapping a picture of each one. If it were traditional, you might draw all your elements on one sheet and snap a photo of each sheet, but because we can use layers, we could adjust the layers by turning them on and off to get the frame we want and shoot that.
“Shooting the film” means exporting out a PNG which is a snapshot of which layers we have turned on. So we can make her blink and sway her hair to the right by setting the right layers to visible (and hiding the rest).
You’re probably thinking: this is tedious. :)
And yeah, it’s tedious as F.
The Miracle, Page 5 was manually filmed by me. To help me organize, I had a google spreadsheet that contained the names of the layers and a timeline spelled out for which frame should be showing at what time, and then, I manually went through the layers and switched them on and off and exported a PNG. For about 180 frames. It took quite a few hours of intense concentration, and I often forgot which frame of the animation I was on and which frames should be turned on and off.
If only I had some way to automate that process…
I know, I could cave and get Flash, but I don’t want to work in vectors or rent software from Adobe — I did that for two years. I could try some open source animation packages like Synfig, but I’d have to learn it from the ground up, and I don’t want to do that. Autodesk Sketchbook Pro 7 has an animation timeline feature — it’s pretty close if not exactly what I want. But, I don’t want to rent their software either.
I know GIMP can open PSD files and Manga Studio can output PSDs.
I also know that Google Spreadsheets with the help of a JSONExport plugin could output data from a spreadsheet that I could read into another application. I’ve done this for The Shrine. What if I could author a basic spreadsheet to act as a timeline? Each column would have the name of a layer group and each cell would describe which layer was turned on (1, 2, 3…) or if the layer group was off. I’d have what you see in the image below. That’s not too bad to author and export.
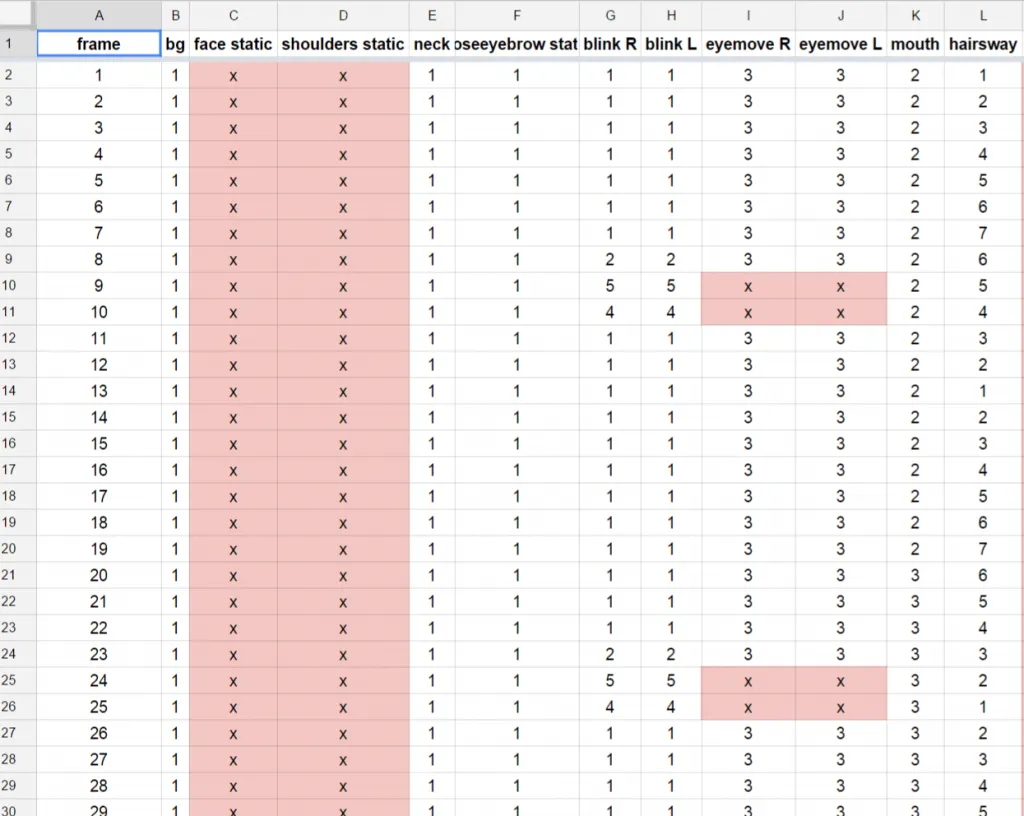
You can see the “hairsway” layer at the far right of the spreadsheet. It cycles from frame 1-7 and then goes back from 6 to 2, and loops. You can see the eye blink (“blink L” and “blink R”) and when it switches frames to handle the blinking.
Here’s the JSON data from that spreadsheet:
So that’s the data for the timeline.
I know GIMP has plugins, but could I…somehow write a plugin that would allow me to manipulate a PSD layered file with data specified by a JSON file representing a timeline? If I did that, I could output the PNGs for individual frames. I could even output the animated gif itself.
The short answer is to these musing is: Yes I can, because that’s what I did.
Animation Filming Plugin
The data I needed for the plugin:
- Google Spreadsheet will be used to fill out the animation timeline and export as a JSON file. The columns are the layer names. There’s a special column called “frame” to tell the plugin what frame we’re exporting (see above image).
- Manga Studio will export the PSD of the animation file. All of the frames of animation are nested in layer groups. The names of the layer groups and the headers of the JSON file must match.
The UI for the plugin:
- Be able to specify the PSD file to open.
- Specify the JSON timeline file that goes with the PSD
- Button to export frames and animated GIF
GIMP uses Python to make plugins. It took me maybe 2 hours of googling and setting up GIMP and python and getting a basic .py script to access an image and open it. Once I had that, then the door was wide open.
It took another six hours on a Sunday afternoon to put together a script in GIMP that would allow me to automate the filming process. This involved opening the PSD and JSON file and iterating through the JSON’s data to determine which layers were on and off and then having GIMP set them and export a PNG, and do this for every frame of the animation.
GIMP’s Python-fu also makes doing UI easy, so I’m grateful for that. Here’s what the UI looks like for my plugin:
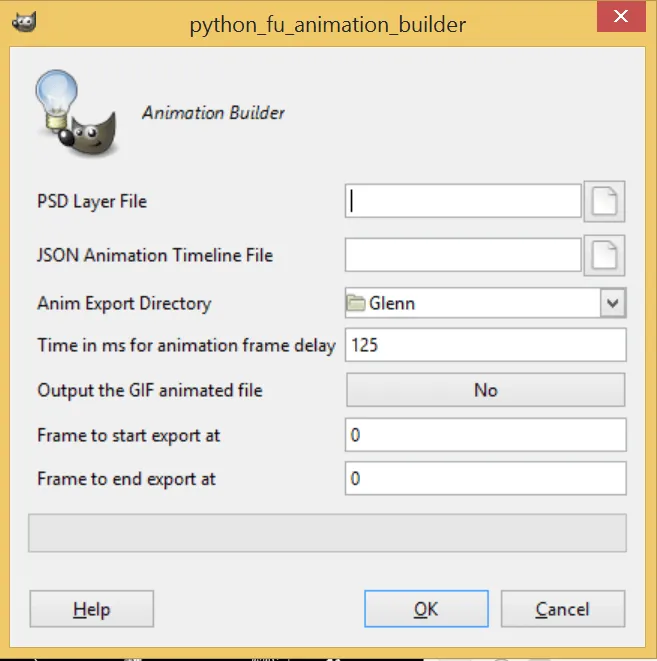
You can see, it’s got some other fields, and there are reasons for that.
- PSD Layer File. This is the filepath to the PSD.
- JSON Animation Timeline File. This is the filepath to the JSON export data.
- Anim Export Directory. This is the folder where the frames and GIF are exported too.
- Time in ms for animation frame delay. I included this to tweak the animation speed. Yes, GIMP can let you manipulate time per frame, but right now the plugin I wrote doesn’t have that capability
- Output the GIF animated file?
- Frame to start export at
- Frame to end export at
I’ll explain the last three options now: Exporting small layers of images, like say 800 x 350 pixels in size, is fast and easy for GIMP. It can pop those frames out fast, but for the final page, I thought I would need frames that ranged more like 4,000 x 2,000 pixels. In other words, really big PNGs. Now multiply that by 87 frames just for the top frame of the comic. I don’t know how GIMP manages its memory, but exporting frames of animation that big would cause GIMP to crash after 7 frames. I assume it ran out of memory, and to mitigate this issue, I created a start and end frame set of fields so I could continue the animation filming from the point it died. I added a toggle to turn off GIF output, so it wouldn’t spend extra processing and memory on that. I don’t know if there’s a better way to fix it, but it gets the job done, and so I’m going with it.
Also, in the end, I decided not to do 4000 px wide images, but cut it in half, which means it would save a lot of memory and process more frames before it died.
The tool is, right now, one of my favorite things ever. I know it’s not solving protein folding or curing cancer, but I love that I was able to go from googling about the possibility of making it to having it by the end of the afternoon. It’s allowed me to preview my pencil tests faster. It’s allowed me to adjust frame timing in google spreadsheets and experiment. If I don’t like something, it can be removed easily. If I need another layer, I can add a new column. Something that would be prohibitive because it would take 1-2 hours of “filming” are done in 1-2 minutes for a preview (800 x 300 px sized images). I problem solved my way to a solution.
Do you want to animate stuff too?
I’d love to share this monstrosity with the world in that case. :)
So, if you are looking to do some hybrid digital/traditional form of animation, and want to mess with this script, please leave a comment below and we’ll chat. I have it hosted in bitbucket, but it’s currently private and if there’s interest, even a little, I’ll open it up.
If you’re a python or GIMP plugin developer and you think you can improve this or do something cooler with it to make it easier to use, then we should also discuss. I don’t mind handing the reins over. The goal would be the same though: make a way to film raster images as an animated sequence.
If you think this is all insane, I’d love to hear that too. :)
I don’t recommend doing things this way, but after looking for free animation software (Pencil 2.0, PAP, Synfig, etc.) I just couldn’t find anything I liked. Pencil seems to be in progress, so it’s not ready for use. I didn’t want to learn new software like Synfig (I’m sure it’s fantastic at what it does, but I didn’t want to cross that hurdle at this point in time). Anything else cost money and I didn’t want to put money down on something that I may not use a lot of — Toon Boom, Anime Studio 11, Sketchbook Pro 7, Photoshop CC, and, well, there’s a ton of other apps out there beyond that. I know how to do paper and pencil animation, and this is my translation from physical paper to digital. Doing this script allowed me to leverage working in Manga Studio 5, which I know and love, and using GIMP which can export animated GIFs easily.
Next time, we’ll discuss Blender and particle systems.
Useful GIMP Python Links